

Using Rich Pins On Pinterest and Why It Should Matter To You
What Are Rich Pins?

The most straightforward distillation of rich pins is to think of them as the upgraded version of a basic package. Enabling rich pins is like adding sour cream and guacamole to a plate of chips and cheddar - melted, of course.
There are regular pins and then suped-up pins, aka rich pins. But what makes them a premium package? Well, they optimize your pins by giving a better user experience by providing additional information. Because of this extra layer of useful info, rich pins get more engagement than regular pins. Pinterest knows this, so they give rich pins favored distribution across the platform.
From a creator’s perspective, rich pins can automate any changes you may need to make to a product URL such as price or availability. This is particularly relevant to jewelry designers who constantly have to update their prices based on precious metals’ market price.
Once you have rich pins enabled, any changes to your product pages will be reflected in all the pins you upload, including pins published and circulated on Pinterest. This feature is the same for blog post updates also.
There are three types of rich pins on Pinterest -
Product
Article
Recipe
Since I teach with a focus on product sellers and makers, I’m not going to cover rich recipe pins. If you wish to explore further on your own, you can here.
Before I start, to enable rich pins you must first claim your website. If you haven’t done that yet, you can get instructions on how to that here.
When you set up rich pins on your account, Pinterest will automatically add more information from your site to the pins you upload. With a little front-end effort, rich pins will enable the following information on your product pins -
Up-to-date pricing
Availability
Product information
Bold text for the title that will stand out in the feed and shows that the link has been verified
Buy button
Profile icon next to the pin title
For rich article pins, Pinterest will add -
Title or headline
Description
Author of the blog post or article
Bold text for the title that will stand out in the feed and shows that the link has been verified
Follow button
Profile icon next to the pin title
Setting Up Your Rich Pins
There are two ways to facilitate rich pins on your account.
Uploading your product catalog to Pinterest >> then using the rich pin validator.
Inserting code snippets into the header section of a product page or in a code block in a product page’s body >> then using the rich pin validator.
Product Catalogs
The first option is, by far the easiest to implement. But, the process to do so will vary depending on which platform you are on. Below are the supported formats of your product catalog.
Tab separated (TSV)
Comma separated (CSV)
XML (RSS 2.0)
It’s not uncommon for your site’s product catalog to be slightly different from the formatting that Pinterest requires. Go here to troubleshoot changes you may need to make to your spreadsheet so that it aligns with Pinterest.
If you have a Shopify site, then there’s a simple plugin that will handle your catalog upload for you. Suppose you’re on a WordPress site like WooCommerce, use YoastSEO. Since I’m on Squarespace, I’ve identified how to streamline this process for those who are also using the platform. To access my catalog converter tool that will re-format your product CSV to meet Pinterest’s requirements, you can here.
Code Snippets
As I mentioned above, the code route is more complicated than product catalogs. I want to touch upon a few high-level things to keep in mind if you decide to go this route. There are two options depending on the architecture of your site.
The primary use for using the below code markups would be for those who do not use an online site-builder such as Shopify and who have a custom-built site. They are a standardized HTML snippet that Google, or in this case Pinterest will look at to understand the kind of content that lives on a page.
The Open Graph markup code snippet below gets injected into your product pages’ header section and is the most common option. Be sure to replace the generic fields with your actual product info and price. You’ll have to edit these fields for every product page.

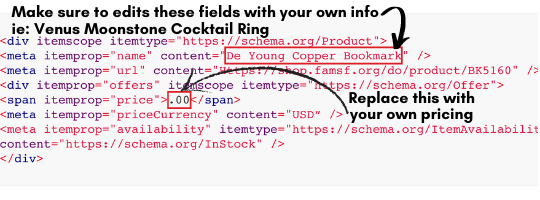
If you need to put the code in your product pages’ body, use the Schema.org markup below. Again, you’ll want to replace the generic fields with your information and edit the fields for every product page.
A few more considerations are -
To apply for rich pins by going the code route, you only need to put the code snippet on one page and run your product page URL containing the code snippet through the rich pin validator. This action will also double check your work to make sure you injected the code correctly.
Only rich pins created by using catalogs can be promoted. Keep this in mind if you’re considering running a promoted pin campaign.
The rich pin validator does two things -
Validate that the meta tags are present on your product pages by ‘crawling’ them.
It simultaneously functions as the application process. If everything checks out on your product pages, you will get an approval message to initiate your application’s processing. You should know if your site is approved within 24 hours.
You need to be logged into your Pinterest account to use the rich pins validator.
It will take 2-3 days from the time you’re approved for your rich pin data to be added to your regular pins.

Copy and paste the URL that you want to validate, then hit the validate button.

If you enabled everything correctly, then you should see a message like this.
Once you’re approved, any pin you create with a URL that points to product pages with the correct meta tags should appear like this -

Rich Article Pins
If you have a blog, which I highly recommend that you do, then enabling rich article pins is a good idea for your blog post pins.
The process here is going to vary depending on the platform you are using for your branded website. The plugin’s for Shopify and WordPress (WooCommerce) is the same as mentioned above. But I will list them again here -
WordPress (WooCommerce)
For Squarespace users, it’s effortless to enable this on your backend. For the full instructions, you can go here. I will also run you through how to do this below.

What Are Meta Tags and Meta Descriptions?
You may be wondering where these plugins are pulling the extra information from to add to your pins. The answer is in your title tags and meta descriptions. These appear on Google like the below image.

Again, how you edit this information on your site will be determined by which platform you are using. For Squarespace users, you can locate those fields to edit by clicking on the SEO tab inside the editor for a new product upload, as illustrated below.

To have the extra info for Pinterest to pull from to include on your rich pins, you will need to fill these out. I know you’re probably letting out an audible groan after reading this but hear me out. By ensuring that every product page has its dedicated meta title and description, you’re simultaneously giving Google more to work with to better rank your site.
This is a win-win in my opinion.
Writing Good Meta Descriptions
I wanted to include a section with this blog post to cover the best practices when it comes to writing your meta descriptions. It’s essential because this is the front-facing billboard of your product to the internet.
Imagine all of the SERP’s (Search Engine Results Page) that were pulled up after entering a keyword into Google being store windows. Upon looking into each storefront or, in this case, reading the title and meta description, those who wrote the most compelling copy will likely earn your click over those who didn’t.
So, what makes your copy compelling?
The goal of writing good copy is to increase your CTR (Click Through Rate). This means writing for humans because humans perform search inquiries on Google, not AI or algorithms. Try to envision that it was you looking for your product. What would you read in a meta description that would entice you to click the link to explore further?
Here are a few guidelines that can be helpful to get your creative juices flowing -
Articulate the differentiators of your product vs. other similar products.
How will the user benefit from what you offer?
Appeal to the user’s emotions.
Allow them to visualize themselves with your product.
Why should a browser buy from you?
You have 155 characters to wow your window shoppers to come (click) into your store. Use them judiciously and be wary of over-selling that might seem ‘clickbait-y.’ Maintaining trust is paramount and should always be prioritized.
Now, don’t worry about retroactively filling in all of your meta titles and descriptions if you haven’t yet. Just make sure you include this in your workflow going forward. I recommend that your best seller’s product pages have both if they don’t currently.
One last thing, these same psychological triggers in your meta descriptions are incredibly relevant to Pinterest users too. Keep this in mind when writing your pin descriptions.
Conclusion
I covered a lot in this post but as a result, you should have more clarity on how rich pins can be beneficial to your Pinterest marketing efforts. Even though most of this material was technical, the concepts are easily actionable.
Most modern eCommerce sites have plugins to easily upload your product catalog, allowing you to create product pins and rich product pins.
A similar streamlined process is also available to enable article rich pins.
Writing good meta descriptions is vital for your CTR’s (Click Through Rates)
A couple of things to keep in mind is that simply enabling rich pins won’t magically transform your account overnight. It is one optimization you can do to increase your chances for success on the platform, among many. But those topics are for another day. I hope you gained some insight today and better understand rich pins and why they should matter to you. Tell me in the comments below what you struggle with most when it comes to your Pinterest marketing. 🤓📌
